Abstract
In this post I’m running through trying to get your VB.NET program to read and write to an Access database (*.accdb, *.mdb).
Introduction
So the target audience is my fellow degree friends at MMU taking a notorious subject called Software Engineering Fundamentals. In our batch it just so happens the lecturers decided that for our prototype app we no longer have the freedom to choose whatever language and frameworks we want but forced to use visual basic.
So anyhow, call my Googling skills are subpar, but the most recent tutorial by Microsoft on connecting your VB.NET app to Access is here, and it’s pretty dated. So I decided I’d write my own, after banging my head a bit. Here’s what I’m using:
- Visual Studio 2013
- Access 2013
- .NET 4.5
The tutorial itself is really a no brainer, though I expect you know a thing or 2 about coding before proceeding.
The Database
I won’t go through much of how to create and manage Access databases in this tutorial. There are plenty of guides out there to refer to. I will be uploading the sample database used though:
Download the example database here.
Here’s how it looks like:

TIP: After you’re finalized your database or updated it, you should compact the database. This makes your database file size smaller:

Once you’re done checking out the database, save whatever changes you’ve made and close Access before proceeding to the next step.
Connect to Database
In Visual Studio, create a Windows Forms Application with visual basic as the language of choice.
In server explorer (View > Server Explorer to show). Click “Connect to a Database”:

In “Data Source”, change it to use “Microsoft Access Database File”, then select your database directory to locate your *.accdb file.
Now click “Test Connection”.
Should you come accross an error that says:
The ‘Microsoft.ACE.OLEDB.12.0’ provider is not registered on the local machine.

You need to install it some drivers: 2007 Office System Driver: Data Connectivity Components. This is important as it is also needed for deployment; your program will output this exception when you run without it:

The link provided is the 32-bit version. I’d recommend not being too smart to get the 64-bit version; Visual Studio will be looking for the 32-bit driver that unless you explicitly asked it to look for the 64-bit version.
Anyhow, after you’ve done this, clicking “Test Connection” will result in “Connection Succeeded”. Leave the database credentials to their default as they are not important.
Your database should now be registered. Open up “Data Connecions” in your server explorer and you should see “DB.accdb”. Expand “Tables” and you should see a Maid table there.
Add Data Source
Under the “Data Source” tab, select “Add new data source”.
Choose “Database” -> “Dataset” -> “DB.accdb”, and click “Next”. Now be mindful of the dialog that appears:

This is often overlooked by your seniors, because we are so used to clicking through yes, yes, yes in prompts.
Click “Yes”. For most intends and purposes this is what you would expect if you are developing your application. Bear in mind, that whatever changes you which to make on your database now, you should do it on the database file that’s in your project directory.
We will use the default connection string that Visual Studio provides (“DBDataSet” for my case). Click Next.
Under “Tables”, Select the only table there and click Finish.

Notice that in your Solution Explorer there is a new file “DBDataSet.xsd”. As you will soon learn, you can’t delete data sources from Data Sources tab, but by removing this *.xsd file.
Access the Acess Database
Drag and drop the Maid table from Data Sources to your form. This is what you’ll see:
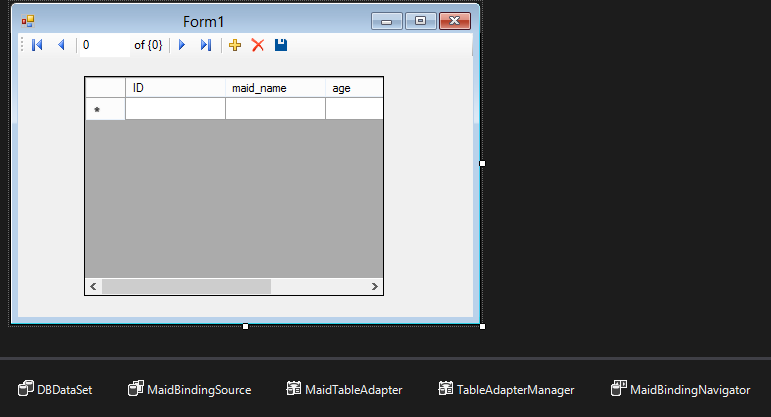
Now comes the part that drives me nuts. You can run the application, change whatever data you want (assuming you don’t put any wrong data inside e.g. putting words into ‘age’) but it never seems to write to the database. Is it because you need to click the “save” icon? You probably tried that already.
What happens, if you recalled from earlier, is that each time you run from Visual Studio, Visual Studio makes a copy of the database file to your build directory (bin/Debug) and overwrites an existing copy should it exist. What it means for you is that it is totally confusing that your program can never seem to touch the database when in fact your IDE overwrites the database with a fresh new copy at each new run.
To convince yourself, try running the program outside of Visual Studio. It actually does write to DB.accdb.
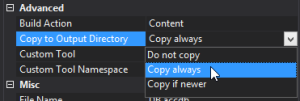
Have no fear! This behaviour can be changed. Right click DB.accdb in your solution explorer and select “Properties”.
Under “Advanced”, there is an option called “Copy to Output Directory”. Choose the option that best suits you. Though, as you will learn, the default behaviour is preferred when you’re developing, because you might be constantly making changes to your Access database (adding columns and tables and whatnot), so you’d want a clean slate for each run.
Back to our grid view: you’d probably want to remove the ID column. So let’s do that now. Click the small triangle on the GridView and select “Edit Columns”. From there remove the ID column.

GridView Exception Handling
Now for some code!
So now in your program when you enter some silly string in the age field this happens:

Yikes! It doesn’t even let me leave the application after I click OK! No marks for that kind of sloppy work!
Let’s have something more straight forward:

Right click on your DataGridView control and click “Properties”. Under the properties window to your left, click “Events”. Under “Behavior” double click “DataError”.

This will direct you to the code component of the form (alternatively you can get there via pressing F7; shift-F7 to go back to form view).
So this will be the function that executes each time there is a validation error. Have your function look something this:
Private Sub MaidDataGridView_DataError(sender As Object, e As DataGridViewDataErrorEventArgs) Handles MaidDataGridView.DataError
    e.ThrowException = False

    Dim txt As String
    txt = ("Validation Error in column '" &
            MaidDataGridView.Columns(e.ColumnIndex).HeaderText & "'." &
            vbCrLf & vbCrLf & e.Exception.Message)
    MessageBox.Show(txt, "Error", MessageBoxButtons.OK, MessageBoxIcon.Error)

    e.Cancel = False
End Sub
And you should get the result as shown in the picture above. Note that it also reverts the changes you made previously.
The Maid Example Project
Download the source code from this link: https://github.com/bruceoutdoors/MaidSystemExample
Just click “Download ZIP” to your right if you have no idea what git is.

Now, here on I expect you to go figure based on the source code I provided.
CRUD Operations with Adapters
There are 2 ways in manipulating data in this project; both methods will modify the access database.
- Changing the DataGridView and then updating the TableAdapter (PeanutBtn_Click, DelRowBtn_Click).
- Changing the TableAdapter and then updating the DataGridView (DelPeanutBtn_Click, AddMaidBtn_Click).
In #1, the MaidDataGridView object is being modified, and then to save the changes, we call the SaveDataGridViewChanges() method. In #2, the TableAdapter class MaidTableAdapter is being modified, and we call MaidTableAdapter.Fill(DBDataSet.Maid) to update the DataGridView.
Some pointers on the MaidTableAdapter class. The methods ScalarQuery() and DeleteByNameQuery(maid_name) are added explicitly by us. You do this by double clicking DBDataSet.xsd in the Solution Explorer. This allows you to edit the dataset with a designer view:

I won’t be guiding you on the procedures that follow though, as they should be pretty straight forward. As much as possible, I’d recommend delegating any fancy querying logic to TableAdapter class than manually getting row objects and doing stuff on it or writing raw SQL strings. It makes the code more readable.
[Bonus] Alternative to Using Access?
You can use Service-based Database. Microsoft MSDN has a guide which you can read here. You’ll be writing to a *. mdf file, and you’re basically using a compact embedded version of SQL Server. Visual Studio should come built in with SQL Server Compact; if you don’t have this you may download via Microsoft download site.
Should you be unable to add tables or execute queries into the database, or in other words you lack these options as displayed here:

You need to install SQL Data Tools (get it from here), though in the walk-through it is mentioned:
To complete this walkthrough, install Visual Studio Express 2013 for Windows, Visual Studio Professional 2013, Visual Studio Premium 2013, or Visual Studio Ultimate 2013. These versions of Visual Studio include SQL Server Data Tools.
Well, mine didn’t come installed with SQL Server Data Tools so it got me pretty confused to begin with. Visual Studio could have at least been more explicit than just removing context menu options.
Other than that, the same rules apply as written above. Adapter classes work as usual, and you need to be aware of Visual Studio copying your database on each time unless you told it not to do so.
Conclusion
Hope you had a good read! Feel free to leave comments and likes (:

Thanks
LikeLike
thanks for your great explanation. It makes it all clear for me
LikeLike
Can you tell me how to fix this. vs 2010 and ms access 2010 wants me to sign in with userame and password but not allways
LikeLike
Very Usefull information. Thank you.
LikeLike
this was great, many thanks…
LikeLiked by 1 person