Yet another “build a WireGuard VPN” guide! This setup here is mostly automated with scripts and Infrastructure as Code. It is meant to be quick temporary VPN setup; you spin it up in a few minutes, do whatever and destroy after use. There’s only about 50 lines of bash to put everything together.
This guide is a little technical; guardrails not included.
The stack pulls the latest Ubuntu image, sets a static public IP address, sets up session manager, whitelists UDP port 51820, then runs the following setup script:
This file contains bidirectional Unicode text that may be interpreted or compiled differently than what appears below. To review, open the file in an editor that reveals hidden Unicode characters.
Learn more about bidirectional Unicode characters
Lastly, it adds a wg-addclient executable which we will get to later.
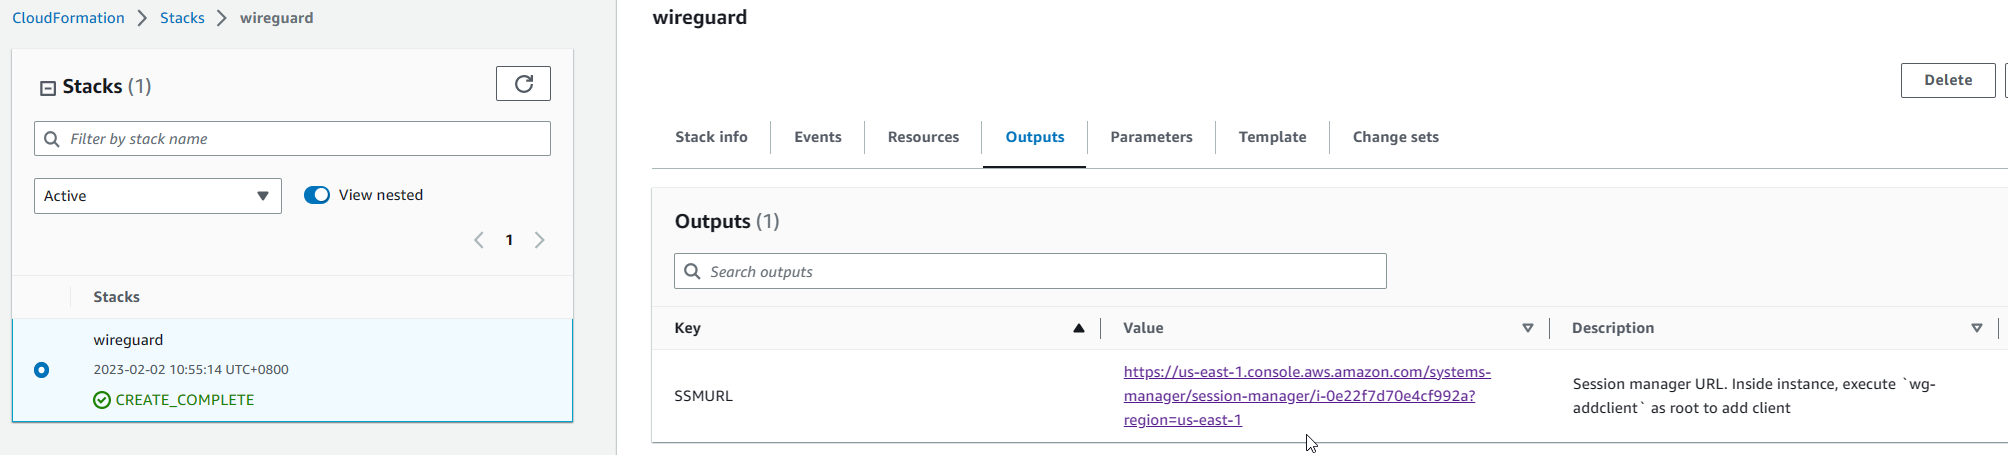
To connect to the instance, use session manager. The URL is under “SSMURL” under the “Outputs” tab:
Just click on the link and you get remote access to the instance via your browser window.
If you don’t use AWS, you just need to run wg-setup.sh as root user in a publicly accessible Ubuntu server. Make sure to white list UDP port 51820 from any firewall.
This setup will cost you 0.01 USD per hour (us-east-1 region), or 0.24 USD a day; you can explore lighter instances for more cost savings by changing the “InstanceType” parameter of the stack.
I’ve also gotten this running with an Amazon ARM server (since they are having a free trial now for t4g.small until Dec 2023) with the following parameters to the CloudFormation stack:
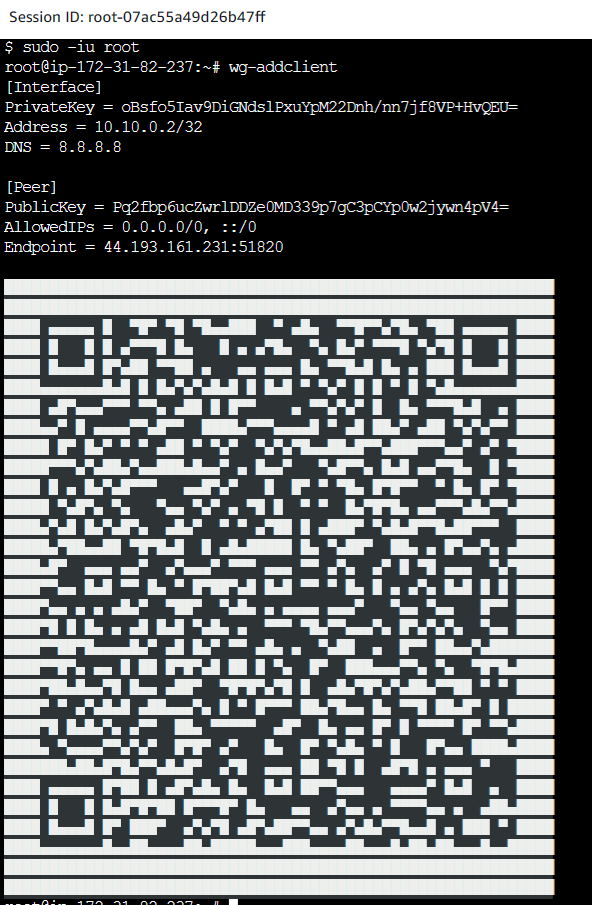
In the VPN server, execute wg-addclient as root user:
sudo -iu root
wg-addclient
Here is wg-addclient for your perusal:
This file contains bidirectional Unicode text that may be interpreted or compiled differently than what appears below. To review, open the file in an editor that reveals hidden Unicode characters.
Learn more about bidirectional Unicode characters
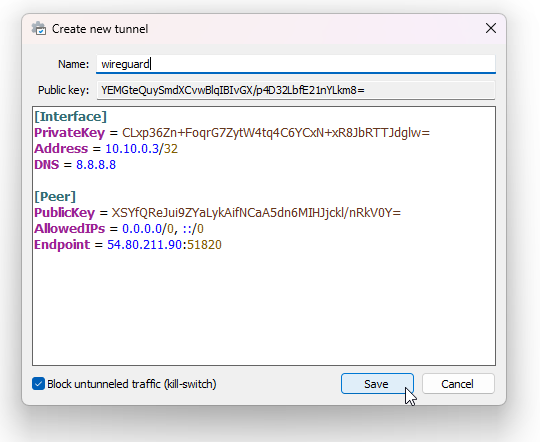
Give the tunnel a name and copy-paste the text contents from wg-addclient and click “Save”
Monitor Clients
Use the wg command:
# wg
interface: wg0
  public key: XSYfQReJui9ZYaLykAifNCaA5dn6MIHJjckl/nRkV0Y=
  private key: (hidden)
  listening port: 51820

peer: YEMGteQuySmdXCvwBlqIBIvGX/p4D32LbfE21nYLkm8=
  endpoint: 93.184.216.34:54114
  allowed ips: 10.10.0.3/32, fd86:ea04:1111::3/128
  latest handshake: 14 seconds ago
  transfer: 106.50 KiB received, 660.57 KiB sent

peer: DvLpEHPP5cFoX4nlFg0Jehq2RLZ0dBua/tEtRpXQvTI=
  endpoint: 93.184.216.34:53107
  allowed ips: 10.10.0.2/32, fd86:ea04:1111::2/128
  latest handshake: 1 minute, 4 seconds ago
  transfer: 721.85 KiB received, 3.46 MiB sent
In the example above, I have 2 clients (my phone and my laptop) connected. Your devices can only be referenced by their public key – there’s no built-in way to put a name to these devices.
Removing Clients
Internally, all wg-addclient does is append to /etc/wireguard/wg0.conf something like:
And so to remove a client you remove the corresponding entry from wg0.conf and reload the WireGuard service:
systemctl reload wg-quick@wg0
Destroying the VPN
As mentioned earlier, this is meant to be a temporary VPN setup. Leaving this running long-term will probably cost you more and you should consider just paying for a VPN service.
Destroying the VPN is as easy as deleting the CloudFormation stack. All the corresponding resources (EC2, security group, EIP, IAM etc) will be cleanly removed and no further charges will be incurred.
Closing Remarks
Though I haven’t tried it, you could get WireGuard running with a nice admin UI similar to OpenVPN. See “Web UIs for WireGuard That Make Configuration Easier” for some good picks, though they will likely conflict with the setup here.
So I was briefly involved in some project that was probably built back in the early days of the web – back when most developers wrote vanilla PHP scripts and thought JQuery was cool, before the enlightened era of batteries included web frameworks like Rails or Laravel. I was faced with security practices so ancient or nonexistent that it was arduous to hammer down all the loopholes – it was like a hopeless game of whack-a-mole.
This convinced me that the best way to secure a system is to start early: right from the systems design itself, bubbling up to its individual components; the system should be secure by design. This is only possible if architects and developers are cognizant of security vulnerabilities. At the very least, we can steer clear of obvious amateur mistakes. And so begins my journey to dig a bit deeper into the cybersecurity world.
Björn Kimminich’s Juice Shop
This is where I stumbled upon the benevolent OWASP initiative, which is on a noble mission to improve software security through open-source initiatives and community education (yes, I just copied that from their website). I spent a month or so fiddling with their Juice Shop project, which is a super advanced e-commerce app/pedagogical tool that is loaded with insecure code and bad practices. Most of the information here is distilled from what I learnt from trying out the challenges and reading their source code.
Even if what you intend to do career-wise is build cool stuff, and even if most web frameworks would already have best practices bootstrapped, I highly recommend the Juice Shop. I have really nothing more than praise for Björn Kimminich’s work and the community behind it. I love how hands-on it is in showing first-hand how perfectly fine written code can hide exploits when you don’t know what to be looking out for.
A General Guide for Secure Design
There are a lot of general guidelines out there, but if I sum things up to one piece of advice it is this: your system is only as secure as its weakest link. It only takes a silly bug or some innocent negligence to introduce an attack vector.
It is important to note that secure design is very hard. More than just memorizing a list of possible exploits, a developer needs solid fundamentals in operating systems, networking, databases, cryptography etc to understand how a hacker can exploit this knowledge in creative ways to hack a system. It is challenging enough for developers to track the plethora of knowledge just to build a usable system to get their million-dollar startup off the ground, and often times security becomes an afterthought in the process. As such, I do not imply from these general outlines that secure design is trivial, but that they are important nonetheless.
I can’t say I’m an expert; it’s obvious to me that what I learned is simply the tip of the iceberg. In fact, I take very little interest in actually becoming a security expert or pen tester. But I hope my points here will be of use to the dear reader.
#1: Never trust user-generated input.
Assume that any user input can come from a skilled hacker with an innate understanding of how your system works. Always question whether the data you are receiving can be tampered or forged. It does not matter whether it’s the date time, HTTP header, user agent: if it is from a client, it can be tampered. Do not depend on these values in any serious application logic. Assume the client application can be compromised. Assume the user will do absolutely everything but how you intended your service to be used. Use strict input validation (like JSON schema) to limit API requests to only what is necessary and sanitise anything that can be vulnerable to injection attacks. Pay close attention when any part of the user input will be sent to an interpreter (e.g. SQL query, javascript eval, template engines). Any time an application uses an interpreter of any type there is a danger of introducing an injection vulnerability (Case study: Node.js VM context is a weak sandbox)
#2: Anything exposed to the public will be exploited.
If an endpoint is meant for development purposes, don’t assume somebody will not find it just because it is not accessible from the main site or is not documented. Don’t assume that just because a secret public endpoint is only known to your engineering team, it is safe. On a related note, you must make sure you do not display debugging information like stack trace or database error messages in your production environment. It displays a lot of information to help in debugging, but it also displays a lot of information for a hacker to figure out how to exploit your system. If an endpoint is meant for internal use (like Prometheus‘s /metrics), make sure it cannot be accessed outside of the internal network. Assume hackers are clairvoyant! If it is out there, he will find it!
#3: Scrutinize your tech stack and application dependencies.
What complicates security is that vulnerabilities can be very specific to the OS, platform, library, tool, software package, and programming language you use. It is practically impossible to memorise all possible attack vectors specific to every stack, but at the very least, do a quick google search to see what are known vulnerabilities of every component of your tech stack. For example, if you are going to use XML to store data, be mindful of XXE exploits, or if you are going to process zip files from users, take note of zip slip. Known vulnerabilities are typically publicly documented in the main documentation itself, marked visibly for all to see. For example, in the PHP manual for the mysqli_real_queryfunction:
In any case, as a developer, you should read the main documentation (instead of just copypasta from someone’s blog), cause hackers also read them!
In addition, just as important as the code you write is the code you didn’t write but depend on. For sensitive code that does authentication, you want to pay close attention (e.g. like your JWT library), but really any one of your dependencies can be a potential attack vector. If any one of your application dependencies is compromised, an attacker can gain access to your system. A good example of this is the eslint-scope incident, where an attacker gained access to a maintainer’s account and published a modified version of the eslint-scope NPM library that attempts to exfiltrate a victim’s npm account credentials. Check your dependencies for typosquatting, and ensure the library authors are trustworthy (you can use tools like Snyk to automate this process).
#4: Limit service access as much as possible.
In the industry, this practice is often referred to as the principle of least privilege. If your service does not need to access a database, do not make it accessible to that database. Consider the event in which an attacker can execute arbitrary commands (via remote code execution or RCE) to your compromised service, and what files or endpoints be exposed to the attacker. Be particularly careful when you use the same server to run multiple services or store data. In general, for production environments, it is a good idea to use a separate server or VM for the database.
Keep your network as heavily firewalled as possible and monitor any unusual ingress egress requests (you could use a service like CrowdSec). Traditionally you could compartmentalize services by segregating your internal network into their respective subnets, but in containerized environments like k8s, internal networks can be declaratively created by the container orchestrator. Never run your service as a root user. Consider creating a unique user for the service only; in the event an attacker can perform RCE, its access is limited. Containerised environments like Docker provide a good sandbox to prevent an attacker from accessing sensitive files (/etc/passwd, private keys etc) in the host server.
#5: Read up on development best practices related to security.
It is a good idea to be mindful of well-known attack vectors, and existing solutions to mitigate them. Be mindful of where you get your sources. Don’t just take any blogger’s word (like mine) as gospel. A good place to start is OWASP cheat sheet. If you are active on YouTube, I suggest checking out PwnFunction and Liveoverflow.
Epilogue
Now, though this post talks about software development, cybersecurity is more than that. My point is to emphasise the importance of cybersecurity in software development, which is often overlooked especially in the early stages of development. In truth, cybersecurity extends beyond the systems you design: often times people become the weak link, but this is not the focus of this post.
Cybersecurity is an ongoing process. It is never a one-off where your system is henceforth secure. Yes, a solid foundation and clean architecture go a long way, but vulnerabilities can easily be introduced by an innocuous change at a later date. Similarly, your education on cybersecurity (and really computer science in general) is never a one-off process. New vulnerabilities rear their ugly heads from time to time, and hackers always find ingenious exploits in ostensibly secure systems; it will truly surprise you how smart hackers are.
Naturally, it is difficult to keep up with all the news of current vulnerabilities, and even stringent code reviews may not suffice. In addition, it can be a conflict of interest to both push out new features on time and consider all the ways an attacker can mess with them. Thus, development with good security practices in mind is not a substitute for having periodic security audits, a security team, or bounty programmes.
True story – I was in a client’s development environment one day and realised that I was able to login to my account with literally any password I keyed in. I went to the source code (PHP) and found out that somebody added code that looked something like:
if ($password = "very-secret-passphrase") {
    // login without checking password…
}
But that means only if my password is “very-secret-passphrase” will I be able to login right? Wrong. This is because he placed an assignment operator (=) instead of an equality operator (==), so the condition is true always and therefore I can login as any user even if I skipped putting a password.
The fact that code like this is even possible blows my mind 🤯. I decided there has to be some tool out there that can spot this kind of silly mistake to begin with.
Phan: PHP static code analysis
Overlooking that this is bad practice and that there is no proper testing, enter phan – a tool for PHP static code analysis!
I first took note of Phan when Rasmus Lerdorf (the creator of PHP) introduced it in his talk (“25 Years of PHP”). I thought it would be great if it could pick up silly code like checking the condition of an expression that is always true.
PhanRedundantConditionInGlobalScope Redundant attempt to cast $password of type 'very-secret-passphrase' to truthy in the global scope (likely a false positive)
Out of the box, VSCode doesn’t have this built-in, so I got lazy and see if PHPStorm had it. Turns out they have it in their issue tracker for 6 years now – the Jetbrains folks probably didn’t think it was important.
Phan depends on php-ast so I had to install it first. The suggested method of using pecl did not work for me (Fatal error: Array and string offset access syntax with curly braces is no longer supported), so I need to install using the prebuilt windows DLL at https://github.com/nikic/php-ast#installation.
In their file server, I downloaded the latest DLL I can find (php_ast-1.0.16-8.1-ts-vs16-x64.zip) and extracted php_ast.dll to my PHP extension folder at C:\xampp\php\ext\.
I then added to C:\xampp\php\php.ini this line:
extension=php_ast.dll
With php-ast installed, I install phan (as of this writing v5.3.2) globally via composer:
composer global require phan/phan
The executable will then be available phan.
Now cd to your project directory to generate a config file for phan (level 1 is the strictest setting):
phan --init --init-level=1
The file will be at .phan/config.php. You will need to edit the file to set the PHP target version (mine is 7.4) and the directories it reads:
Then the extension needs to be configured. To do this you can edit VSCode’s settings.json (File > Preferences > Settings, enter “@ext:TysonAndre.php-phan” at the search bar):
You can find your phanScriptPath by entering in the command prompt (if you’re in Windows, remember to change the back slashes to forward slashes!):
where phan
I didn’t need to pass in the phanScriptPath since the extension has phan built-in – however, the extension is out of date (current is 5.3.2, the extension is still using 5.1.0), and the warning I want to see is only in the newer version.
Now restart VSCode, and the extension should work:
Note that the extension only analyzes a file when you open it, so the results take a few seconds to show up.
Extension Limitations
My main gripe with this extension is that it is only limited to a single project directory. The author is cognizant of this and writes in the extension settings description: “In the future, this VS Code extension may support analyzing more than one project“.
I had tried substituting C:/PATH/TO/PROJECT/DIRECTORY/ with ${workspaceFolder} (ref: VSCode Variables Reference), but it doesn’t seem to be supported.
Sounds great – but considering this extension hasn’t been updated for almost a year, I wouldn’t place any bets on that.
Even so, you can consider me a big phan – cause phan is phantastic! 😉
I have spent a lot more time than I should be looking into solutions on database migrations for RDBMS. Sure, on the surface, there may seem only a few ways to hammer a nail, but dig a little more and it is an endless rabbit hole. I figured in this writeup I will put together all the various techniques and ideas on handling database migrations.
These ideas are mainly assembled from 7 different database migration systems 🥊:
Flyway 🕊 – SQL file-based database migration system
Liquibase 💧 – flexible migration system with a monitoring dashboard
Now, just because I didn’t mention them here doesn’t mean they are not good. There are simply too many, and I’ve only looked into these 7 in detail. You are welcome to comment your favourite below and how it stacks up against the competition.
Introduction: The Evolving Database Problem
In production systems, there is typically no such thing as a final database schema. Similar to your app releases, this “final” database is a moving target, and we only develop with the most recent database version (or state). New tables, columns are added, dropped, renamed over time; data gets shuffled to different places – a database tends to evolve from one version to another. It gets messy real quick with a team of developers, so a database migration system eventually gets introduced, and it is not uncommon that companies will opt to build theirs in-house.
There is a great article by Martin Fowler introducing evolutionary database design, as well as techniques and best practices.
Essential Components
Although database migration systems may have a plethora of ideas of how to go solve the evolving database problem, practically all of them shares 4 essential components:
Migration/revision/changeset
Rollback
Repeatable migration
Version tracking
Migration
A migration (flyway) or revision (alembic) or changeset (liquibase) is a single unit of change that brings a database from one version to another. One key problem database migration systems need to address during a migration run is execution order. I will go through 4 strategies on how to solve this:
Filename
Appearance order
Relative revision
Topological order
Filename. This is the simplest and most intuitive strategy. Chances are if you implement a migration system yourself this would be the first approach you would consider. In flyway, you would organise your migrations as such ('V' here stands for versioned migrations):
When you execute flyway migrate, the files will be executed in numeric order. Note that by default, flyway does not execute migrations that are slipped in between executed migrations (e.g. if V1 and V2 have already been executed and you add V1.1 later, V1.1 does not get executed). This can be changed via the -outOfOrder parameter.
One problem with this approach is nothing stopping multiple developers from submitting the same version more than once; flyway will not accept ambiguity in versioning. A common solution for this is to have a CI run flyway migrate in pull requests. Combine this with only merging pull requests that are up to date with master, and you prevent these conflicts from entering your source code in the first place.
A simpler solution to solve duplicate versioning is using a timestamp. This is the most hassle-free way to resolve this and is the approach that Rails Active Record and .NET Entity Framework uses. After all, what are the odds of multiple developers creating a migration at precisely the same second right?? 😉
Here’s an example of Active Record migration folder:
Note that you could also do this in flyway (e.g. V20210617115301__create_table_foo.sql) – but unlike flyway, both the migration filename and contents in Active Record and Entity are generated, where the prefix is the timestamp of migration creation. I will elaborate more on this later.
Appearance Order. A migration in liquibase is referred to as a changeset. Multiple changesets are stored in changelog file. When you first configure Liquibase you need to specify a single master changelog file. In addition to changesets, a changelog file can reference multiple changelog files. Liquibase then executes all changesets and referenced changelogs in order of appearance within the master changelog file, from top to bottom. This makes changing execution order trivial as compared to changing around filenames.
Liquibase recommends the following directory structure, where the changelog is named after the app release version (not the migration version):
Note: It’s a pervasive misunderstanding that liquibase only supports XML. Hardcore DBAs can rejoice to know that you can also write your changesets in SQL. Doing so would deprive you of magical features, but liquibase does allow you to use both file types in the same project!
As with using filenames, conflicts do exist when multiple developers write to the same file, but liquibase claims that this is much simpler to deal with using version control systems like git.
Relative Revision. This is used in Alembic, where migrations are called revisions. The idea is that execution order is not dictated by appearance or filename, but relative from one revision to another, beginning from the initial revision. This can be confusing at first, for example when you see the migration folder in Apache Airflow it looks like this unordered mess:
The first 12 characters prefixed to every migration file is its hash, this is called a “revision ID” – it identifies a migration, but tells nothing about the execution order. To query the past execution order, you need to run alembic history.
Alembic determines ordering from 2 attributes in every revision file. Consider an initial revision 1975ea83b712_create_account_table.py that is generated by the alembic generate command:
The revision attribute is the same as the migration’s revision ID. Where down_revision is None, we know that this is a root node; the first revision that gets executed. Say another revision ae1027a6acf_add_some_column.py gets added (also generated by alembic generate):
This declares that revision ae1027a6acf revises 1975ea83b712, and therefore requires 1975ea83b712 to be executed first. So each subsequent revision from the root knows which revision it modifies, and from there you can build an execution order 1975ea83b712 → ae1027a6acf.
To run migrations, we use alembic upgrade head, where head will point to the most recent revision.
Though we would be tempted to think of this as a linked list, where each node has a reference to another node, in cases where there are multiple developers it is more like a tree. This is because Alembic allows multiple revisions to “branch” from a shared parent (i.e. there is more than one revision file that has the same down_revision). In such cases, alembic upgrade head will fail as there are multiple head‘s. To resolve this, a developer would use alembic merge to merge all heads into one. The Alembic branch docs have a nice ASCII art to illustrate this:
The merge command will create another revision file that fuses more than one revision to a single timeline. This is simply a revision file with multiple down_revision:
As you might be able to tell, these concepts on branching, merging, and head revision is very similar to git. And similar to git, you don’t have to create a merge commit; another strategy is “rebase”, which means you change the parent revision (i.e. down_revision). Assuming there are no conflicts, you can do away with the merge revision and get a clean timeline with no branches.
In the case of our above example, we would change the down_revision of 27c6a30d7c24 from 1975ea83b712 to ae1027a6acf (notice that we also removed 53fffde5ad5):
Topological order. This idea is unique in that it does not see migrations as a linear path with a start and end, but a directed acyclic graph (DAG) where the nodes are migrations and the edges are dependencies. An example of a dependency would be if you have a foreign key constraint, the table it points to must first exist. Now you can run migrations in any order you like, as long as dependencies are met; the execution order is thus defined by its topological order, and there can be many viable paths.
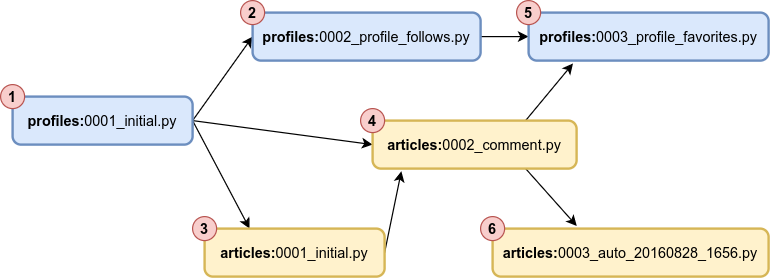
Every migration file has a dependencies attribute, which may contain zero or more dependencies. If a migration has no dependencies, it can be executed prior to other migrations. For example in 0003_profile_favorites.py:
To make the concept more visually apparent, here is its DAG along with a viable topological order (from 1 to 6):
Blue nodes are profile model, yellow nodes are article model. The directional edges can be viewed as “—required by →”. Red circles on the corners of each node mark execution order.
As pointed out earlier, there can be multiple viable execution orders for as long as the dependency conditions are satisfied. For the above example, the following is also a valid execution order:
profiles:0001_initial.py
articles:0001_initial.py
articles:0002_comment.py
profiles:0002_profile_follows.py
articles:0003_auto_20160828_1656.py
profiles:0003_profile_favorites.py
This seems complex, but it provides a lot of flexibility for developers, and greatly reduce the chance of conflicts. Also, developers working with Django are usually insulated from migration implementation details as it is generated via django-admin makemigrations command.
Rollback
A rollback reverts a specific migration. A simple case is when you add a column in a migration, its corresponding rollback would be to drop the column. Typically rollbacks are added within the same migration file, where a migrate function has a corresponding rollback function, as is the case for Entity Framework (Up and Down), and Alembic (upgrade and downgrade).
Some implementations (e.g. Django, Active Record) decide to go a step further by not even requiring an explicit rollback function; the migration tool automagically figures it out for you 🪄! In Liquibase, if you use their XML/YAML/JSON syntax, it can also automatically figure out how to rollback a changeset.
In flyway, rollbacks are called undo migrations; these are just SQL files that map to a corresponding migration (e.g. a V23__add_column_bar.sql is reverted by U23__drop_column_bar.sql). In addition, undo migrations are a paid feature in flyway; not only do you have to write them out by hand, but you also had to pay for a license to do it.
This is not all bad, since you may not always be able to generate or write a rollback. For example, although you can reverse adding a column, you can’t undrop a table or a column, and you can’t undelete rows; once data is gone, it is gone for real. In practice, DBAs tend to only go forward. If you regret some design decision in the past and want to revert it, you write another migration. However, rollbacks are still handy as a plan B in situations where deployments go horribly wrong despite meticulous planning.
Repeatable Migration
There are special cases where you would want to run a migration more than once. These are often stored procedures, and views – and in cases where business logic is part of the database, they are often changed.
Typically repeatable migration work by comparing the checksum of migration of past execution and current execution. Flyway prefixes repeatable migrations with R__, and they are always executed last in any migrate run. Liquibase supports a runOnChange changeset attribute that reruns the changeset when changes are detected.
ORM focused migration tools like Active Record, Entity Framework, Alembic, Django would presume you will never need repeatable migrations. In fact, if you come from ORM land, stored procedures and views are a foreign concept, if not frowned upon (as the rails purists would say, “It is not the rails way!” 🔥).
Although Alembic does not support repeatable migrations out of the box, there is a community contribution Alembic Utils that adds support for it… for Postgres only. Otherwise, you are left with implementing it yourself via this ReplaceableObject recipe in the Alembic cookbook.
Version Tracking
Version tracking is a technique to guarantee that migrations only execute once, or in the case of repeatable migrations – only when the migration has been modified.
Practically every database migration system will implement this as a tracking table in your database. Storing tracking information in your database guarantees atomicity during a migration run (i.e. if a migration fails the version is never tracked). Migration systems may also place a table-level write-lock on a migration table to assert such that only one migration run can happen at any given moment; this is particularly useful when you have multiple copies of your app connecting to the same database in parallel.
Version tracking tables go by many names: alembic_version (Alembic), __eFMigrationsHistory (Entity Framework), schema_migrations (Active Record), flyway_schema_history (Flyway), DATABASECHANGELOG + DATABASECHANGELOGLOCK (Liquibase), and django_migrations (Django).
Typically, tracking tables store only the migration version, identifier, or filename. Execution timestamp may also be stored, allowing developers to roll back to a specific point in time. In some implementations like Flyway and Liquibase, tracking tables also store checksums. These are used for 2 things:
For normal migrations, checksum asserts that an executed migration has not been tampered with.
For repeatable migrations, checksums are used to determine if migration needs to be re-executed.
Workflows
Although database migration systems share a lot of essential components, their workflows tend to differentiate them from the rest.
Revision based workflow
Code first workflow
For each workflow, there are 2 paradigms: either you write SQL that the database directly runs, or rely on source-code generation. In source-code generation, you write your migration in some other language than SQL (XML, C#, Ruby DSL,.. etc) that generates SQL code. It’s an extra step – yes, but developers love this approach with religious vigour. There are a few key reasons:
It can support different database vendors
Can do automatic rollbacks
Allows developers to write in their favourite programming language
Alright, let us walk through the different workflows.
Revision Based Workflow
In a revision based workflow, you write your migration script first, and that determines the next database state. Then continue to add subsequent migration scripts continue to evolve the database over time.
In Flyway, you write raw SQL files the follows a specific naming convention. In Liquibase, you typically use XML, and that enables vendor-independent migrations as well as automatic rollbacks. Active Record takes this a step further with a command that generates migrations for you; use rails generate model command to create a migration file. For example:
rails generate model Post title:string link:string upvotes:integer
This creates db/migrate/20210627134448_create_posts.rb, written in Ruby DSL (Domain Specific Language):
class CreatePosts < ActiveRecord::Migration[5.2]
  def change
    create_table :posts do |t|
      t.string :title
      t.string :link
      t.integer :upvotes

      t.timestamps
    end
  end
end
To make changes to a model you use rails generate migration. For example to add a downvotes column to the posts table do:
More than just being descriptive, the migration name you provide in the generate migration command is used to create the migration itself (i.e. it figures out you want to add a column to the posts table from the name AddDownvotesToPost).
Code First Workflow
A code first workflow can also be thought of as a declarative workflow: you first model out how you want your database to be, and let the migration system generate a migration.
namespace ContosoUniversity.Models
{
    public class Student
    {
        public int ID { get; set; }
        public string LastName { get; set; }
        public string FirstMidName { get; set; }
        public DateTime EnrollmentDate { get; set; }

        public virtual ICollection<Enrollment> Enrollments { get; set; }
    }
}
Then you execute add-migration <DescriptionMigrationName> and a migration file (also in C#) is automagically generated. When you make changes to your classes, simply run add-migration to create a new migration file. In short, your C# classes determine the current state of your database. In Entity Framework lingo, this is known as “Code First Migrations“, and when I first saw this as a young developer 4 years ago, it blew my mind.
As I eluded to earlier, Django also generates its migration files from its models with its makemigrations command. Alembic supports this as well via an additional --autogenerate flag to the alembic revision command.
For folks that disdain source-code generation, Skeema allows you to declare the final schema in SQL, and it generates a SQL diff that changes the target database state to the declared state. In fact, it is so confident in this approach it does not even do version tracking. There are no replaying historical migration files; whether it be a new development instance or production database, we are always one migration away from the declared schema.
Even though it uses plain SQL, Skeema does not parse SQL code itself; it runs the SQL code in a temporary location called a workspace and compares it with the schema of your target database. The generated SQL can be reviewed via skeema diff, and deployed via skeema push.
Some caveats: as cool as code first workflows may sound, they would not cater to ambiguous cases. For example, did you rename column color to colour, or did you drop column color and added a new column colour? The simple answer is that there is no way to tell apart renames. Skeema details this drawback in its product announcement, but assures that renames rarely happen 😉.
Closing Thoughts
Finding the right approach is more than just performance or features. You need to think about developers in your team whether they want to work with some custom migration solution you found in a comment in Hackernews, that points to some GitHub repository with barely any activity or stars. Rarely would developers want to learn something just for one project. Any database migration system you introduce puts a learning curve for your team. Most likely those developers would know little SQL and would hardly have any interest in being good at it. Typically the database migration system they would opt to use is simply the one that comes bundled to the chosen web framework.
Database migration is a messy conundrum without perfect solutions. As I would come to learn – we simply need to decide what is best on a case by case basis.
Sometimes you just want to quickly prototype a streaming system that uses pubsub. You don’t need the full power of the production version in Google Cloud. You don’t want to go through all the long prerequisite setup steps as with the official pubsub emulator guide. You just want to summon pubsub with a single command. And you don’t want to write verbose Java code.
What do you do? Well, an underrated (or perhaps just not really well-documented) alternative is to just spin up a docker container:
As simple as that – you have a fake pubsub emulator running in your machine at port 8085 (the default port). Now we want to use python to start sending and receiving messages. We can use google-cloud-pubsub (API reference is also in the link) by installing it as such:
pip install google-cloud-pubsub
By default, the google-cloud-pubsub plugs itself to Google Cloud’s endpoint. We can instead instruct google-cloud-pubsub to connect to our emulator with the PUBSUB_EMULATOR_HOST environment variable:
export PUBSUB_EMULATOR_HOST=localhost:8085
Now let’s have a publisher up and running. With the emulator environment var set we launch an interactive python console and punch in the following:
from google.cloud import pubsub

publisher = pubsub.PublisherClient()
pubsub_topic = 'projects/dummy-project/topics/test-topic'

publisher.create_topic(pubsub_topic)

# Use publish to start shipping messages...
publisher.publish(pubsub_topic, b'Hello?')
publisher.publish(pubsub_topic, b'Is anyone there?')
I just sent over some byte string payload, so let’s print it in a client. Spin up another interactive python console for the client:
from google.cloud import pubsub

subscriber = pubsub.SubscriberClient()
pubsub_topic = 'projects/dummy-project/topics/test-topic'
sub_name = 'projects/dummy-project/subscriptions/subslot123'

subscriber.create_subscription(name=sub_name, topic=pubsub_topic)

# Blocking call to start listening. Passes all messages to print method
subscriber.subscribe(sub_name, print).result()
Now, if you forget to set the environment variable (as you normally would), don’t worry – Google will not fail to remind you to use their production-ready version:
Traceback (most recent call last):
  File "", line 1, in
  File "/home/bruce/.local/lib/python3.8/site-packages/google/cloud/pubsub_v1/publisher/client.py", line 114, in __init__
    channel = grpc_helpers.create_channel(
  File "/home/bruce/.local/lib/python3.8/site-packages/google/api_core/grpc_helpers.py", line 195, in create_channel
    credentials, _ = google.auth.default(scopes=scopes)
  File "/home/bruce/.local/lib/python3.8/site-packages/google/auth/_default.py", line 321, in default
    raise exceptions.DefaultCredentialsError(_HELP_MESSAGE)
google.auth.exceptions.DefaultCredentialsError: Could not automatically determine credentials. Please set GOOGLE_APPLICATION_CREDENTIALS or explicitly create credentials and re-run the application. For more information, please see https://cloud.google.com/docs/authentication/getting-started